-
Review the shop manual
– Before you begin the task, take time to review the shop manual. It may not be easy to locate the sections of information, but you’re looking for
headings like “drive train,” "rear wheel,” and otherwise. Looking for “chain” may not be an option. The point is, you want to review the steps for
removal and installation of the front and rear sprockets.
-
Remove the front sprocket cover
– On newer bikes this can be tricky and may require you to remove the shift or rear brake levers. If it’s the latter, you’ll need to reinstall the
brake lever for the next step. You’ll probably notice a bunch of crap in the housing space: remnants of every time you lubed the chain, combined
with more road grime than you can remember. We’ll be cleaning this later.
-
Loosen all nuts and/or bolts on the front and rear sprockets
– This is much easier to do with the wheel on the bike, rather than later when you take it off. To accomplish this, put the bike in neutral and have your
buddy press down on the rear brake lever. Use a long handled socket wrench to break the tension on each of the nuts/bolts on the front
sprockets. If it's stubborn you may need to add a length of pipe to the wrench for more leverage, or heat the nut/bolt with a torch. Repeat the same process on the rear sprocket. Leave the loosened heads in place for now.
-
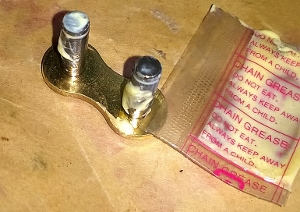
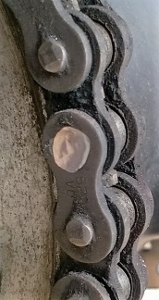 Remove one link pin
– If your chain currently has a split pin master link, you can use pliers to remove the clip by pressing the open end of the clip with one side
of the pliers, while the other side is pressed against the corresponding pin.
Remove one link pin
– If your chain currently has a split pin master link, you can use pliers to remove the clip by pressing the open end of the clip with one side
of the pliers, while the other side is pressed against the corresponding pin.
If you don’t have a clip style master link - pick a pin on the chain – any pin will do. Using your Dremal or similar tool, grind down the pin to
the level of the chain link plate.
-
Remove the pin and link
– Position the burnished pin at the far rear position on the rear sprocket. Using the chain breaking tool, assemble it as per the manufacturer and
begin the process of turning the various heads so you get the tool snug with the chain and can begin backing the burnished pin out the other side.
Keep turning until the pin is totally out.
-
Remove the chain
- Rotate the rear wheel clockwise so the pin you’re working on is along the bottom away from the sprocket. Pull it apart and remove the old chain,
but keep it handy.
-
Mark the sprocket sides
– Some sprockets are directional and not symmetrical on each side. With a grease pencil or white out, mark the outside of the sprocket end so
you’ll know which way to affix the new one if this is the case.
-
Remove the rear wheel from the bike
– Support the bike with the center stand if it has one, otherwise get the bike on a motorcycle jack stand do what you need to do so you can pull
the rear wheel free from the bike.
-
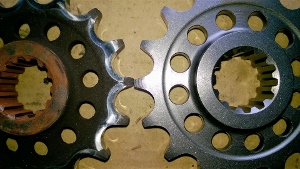
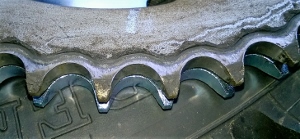 Remove the old rear sprocket
– Go ahead and remove all those nuts or bolts and remove the old sprocket. For fun, A/B it with the new one and notice the differences in teeth
wear. At this time the internal hub is exposed. If it’s dirty in there, clean it out with the chain cleaner product. On most current bikes, you’ll
also be looking at a set of rubber dampers in their design to absorb tension on the hub when braking. Inspect them and replace them if necessary.
Finally, finger the rear wheel bearings and inspect them for play. If it’s showing wear, it needs to be replaced. Typically, this is not the case
on a first-time-around change, but as the bike gets older this will be necessary, so it won’t hurt to have a set at the ready in your parts arsenal
for later.
Remove the old rear sprocket
– Go ahead and remove all those nuts or bolts and remove the old sprocket. For fun, A/B it with the new one and notice the differences in teeth
wear. At this time the internal hub is exposed. If it’s dirty in there, clean it out with the chain cleaner product. On most current bikes, you’ll
also be looking at a set of rubber dampers in their design to absorb tension on the hub when braking. Inspect them and replace them if necessary.
Finally, finger the rear wheel bearings and inspect them for play. If it’s showing wear, it needs to be replaced. Typically, this is not the case
on a first-time-around change, but as the bike gets older this will be necessary, so it won’t hurt to have a set at the ready in your parts arsenal
for later.
-
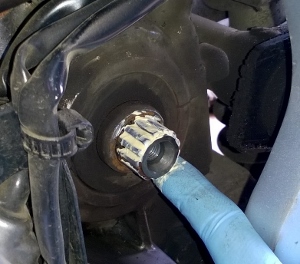
 Remove the front sprocket and clean out the casing and cover housing
– First tug on the large chunks and discard them into the trash. Then spray the chain cleaner all over, allow it to penetrate for a few minutes and
using a shop towel or tooth brush clean ‘em all up so they sparkle.
Remove the front sprocket and clean out the casing and cover housing
– First tug on the large chunks and discard them into the trash. Then spray the chain cleaner all over, allow it to penetrate for a few minutes and
using a shop towel or tooth brush clean ‘em all up so they sparkle.
-
Shorten the new chain
- It’s time to get the new chain to the same link count as the old one. The shop manual tells you what that is. The chain comes in a wrapper. Keep
that handy for keeping the chain clean as you move it from place to place. You can count through the links and note where to shorten it. Be sure to
count one less link on the new chain, as you’ll be adding a master link later that will lengthen it by one. As a second measure, place the new next
to the old. From one end to the other match the links until you reach the point where you’ll shorten and confirm the mark you placed is on the
correct link. Use the Dremal process and chain breaker tool to remove the pin that will bring the number of links to the correct amount, less that
extra one for the master link.
-
 Install the new sprockets
– Never use a product like LockTite when reinstalling the sprockets. If the sprockets have varied sides, now is the time to make note from when you marked the old ones so you place the sprocket on the correct side
in the correct direction. Install the new rear sprocket to the hub, leaving the nuts/bolts loose. We’ll torque them later once mounted on the bike
with the new chain installed.
Install the new sprockets
– Never use a product like LockTite when reinstalling the sprockets. If the sprockets have varied sides, now is the time to make note from when you marked the old ones so you place the sprocket on the correct side
in the correct direction. Install the new rear sprocket to the hub, leaving the nuts/bolts loose. We’ll torque them later once mounted on the bike
with the new chain installed.
Install the front sprocket. Any metal-to-metal contact points such as the sprocket over a spline, or a washer between the nut and sprocket get a
healthy dose of spline compound or assembly lube. This will reduce wear and corrosion and make it easier to remove the next time around.
If the sprocket utilizes a washer, be sure to coat the metal to meal contact points between the washer and the sprocket with the lube or compound as well.
-
Install the rear wheel onto the bike
– Be sure you include all the washers and axle stays as you thread the axle from one end to the other. Thread the axle nut on, but don’t tighten it
yet.
-
Install the new chain
- Place one end of the new chain on the bottom of the rear sprocket and begin to thread the chain turning the wheel and feeding the chain up across
the top and over to the drive sprocket, all the way back around, reconnecting to the rear sprocket, and leaving one link space for the master link.
Place the open link point at the far side of the sprocket - 3 o’clock on a left side chain, 9 o’clock on a right side chain.
-
 Apply the master link
– The new chain probably came with a new master link, 4 O-rings and a small tube of compound. Coat the pins with the compound, run them in and
out of the pin holes, reapply more grease and repeat. The idea here is to be sure you have the space between fully coated with compound so there’s
no metal-to-metal contact.
Apply the master link
– The new chain probably came with a new master link, 4 O-rings and a small tube of compound. Coat the pins with the compound, run them in and
out of the pin holes, reapply more grease and repeat. The idea here is to be sure you have the space between fully coated with compound so there’s
no metal-to-metal contact.
Place one O-ring onto each pin, then from the backside of the chain, press the master link through so the pins arrive out front. Place the other
two O-rings over the exposed pins and gently press the link plate on. Now, as per the instruction with your chain tool, use the appropriate plate
to press the link plate firmly onto the rest of the link, turning the adjuster on the tool to position the plate so there’s enough room to slide
the clip on. Using pliers, slide the clip being certain to position it so the closed side is in the direction of travel.
-
Tighten and torque the sprocket nuts/bolts
– Time for your buddy to get up and do some work. Send him back to the rear brake lever and have him hold it down. With the torque wrench set 20%
below spec, tighten the front sprocket nuts/bolts until the tool clicks. Readjust the torque wrench to 10% below spec and repeat. Finally, adjust
the torque wrench to the prescribed force and tighten until it clicks.
Repeat this three-step process on the rear nuts/bolts, using a star configuration to tighten each nut. Not left to right.
-
Adjust the chain
– Consult the shop manual to determine if the bike should be on a side stand, center stand or positioned with the rider on it before beginning the
adjustment. Using the fractional caliper tool and your shop manual, adjust the chain side adjuster so the slack is to the manufacturer's spec. This
will begin with a number of whole turns, half turns and less until the correct slack is achieved. Use your buddy to give you the slack readings and
tell you how much to turn the adjuster each time.
Hash marks OEM’s use on the axle apparatus are often not very exact. You can go that route, but for a more precise alignment of the rear wheel,
measure the distance from the axle center point to the adjustment screw on the sprocket side. Now match that on the opposite side. Re-check the
slack and make any needed adjustments.
-
Reinstall any covers
– That front sprocket housing needs to go back on. Now is the time to do that.
-
Torque the rear axle
– Use the shop manual to find out the torque spec for the rear axle. Set the torque using the three step method, -20%, -10%, target #’s, rather
than all in a single yank.
All right. Go enjoy your new drive train and dig this article back up next time around.
